300x250 AD TOP

Showing posts with label pc tricks. Show all posts

Wednesday, April 17, 2013

Tagged under: , ,

How to Reset Ubuntu Password


How to Reset Ubuntu Password


If you have ever forgotten your password, you are not alone it is probably one of the most common tech support problems I have encountered over the years. Luckily if you are using Ubuntu they made it incredibly easy to reset your password.
All it takes is adjusting the boot parameters slightly and typing a command or two, but we will walk you through it.


Reset Your Ubuntu Password

Reboot your computer, and then as soon as you see the GRUB Loading screen, make sure to hit the ESC key so that you can get to the menu.


If you have the option, you can choose the recovery mode item on the menu, usually found right below your default kernel option.


Then choose Drop to root shell prompt from this menu.


This should give you a root shell prompt.


Alternate Root Shell Method


If you do not have the recovery mode option, this is the alternate way to manually edit the grub options to allow for a root shell.
First you will want to make sure to choose the regular boot kernel that you use (typically just the default one), and then use the e key to choose to edit that boot option.


Now just hit the down arrow key over to the kernel option, and then use the e key to switch to edit mode for the kernel option.

You will first be presented with a screen that looks very similar to this one:

You will want to remove the ro quiet splash part with the backspace key, and then add this onto the end:
rw init=/bin/bash

Once you hit enter after adjusting the kernel line, you will need to use the B key to choose to boot with that option.


At this point the system should boot up very quickly to a command prompt.


Changing the Actual Password


You can use the following command to reset your password:

passwd < username >

After changing your password, use the following commands to reboot your system. (The sync command makes sure to write out data to the disk before rebooting).

sync
reboot -f

I found that the -f parameter was necessary to get the reboot command to work for some reason. You could always hardware reset instead, but make sure to use the sync command first.

And now you should be able to login without any issues.

Wednesday, February 20, 2013

Tagged under: ,

How to Recover Hidden Files From Virus Infected USB Pendrive without any Software

We are using USB pen drives for data transfer between computers. It's very important to keep your data always with you. When you're using pen drives, the biggest problem is Viruses. Mostly pen drives doesn't consist any security measures. So viruses and malwares can attack our pen drive easily. If virus attacks your pen drive, it hides the all the files and creates .exe extension to replace the hidden files.


Normally you can view hidden files by clicking
Folder Options -->
View -->
Show Hidden Files and Folders
But this simple method doesn't work when your pen drive is attacked by harmful viruses.


So here I'll provide you an easiest method to view your infected files from pen drive without using any software.

Insert pen drive into computer and find drive letter of connected USB drive
For Example, E:

Now click on Start --> Run

In Run box, type cmd and hit Enter

Now command prompt will appear, in command prompt type the drive letter of your pen drive and hitEnter.
Example type E:

After that, type attrib -s -h /s /d *.*


Now hit Enter and wait for sometime. That's all, you have done !!! Now you can view all your files in pen drive without any problems.

Thursday, February 14, 2013

Tagged under: , ,

Simple Trick to Access blocked site (Facebook, YouTube, etc...)

Most of the work places, institute, college, university etc... block certain sites, usually they block the access to social networking and entertainment sites. There are many tricks to overcome this issue, but I am going to show you a simple trick to enjoy certain blocked sites (Facebook, Twitter, Google+, andYouTube) from your institute or work place.


How to do it?


System administrators block only http://, but not https:// , so you can simply add the letter “s” after http and access into that particular site.


For example:

Change http://youtube.com/ into https://youtube.com/ , so you can try in any place where your blocked site lets you enter through the secure protocol.

Thursday, January 17, 2013

Tagged under: , , ,

Showing Only Post Titles On Blogger


Showing Only Post Titles On Blogger


If you own a news website or a website where you post so many times in a day with lots of text and sometimes short posts then you probably need to show only post tiles on yourhomepage instead of whole content or some thumbnails.

This trick is very useful because sometimes you may post very little posts like "Someone Returns Tonight" and instead of checking the post your viewers can know who returned in theshort version in homepage like "Vampire returned at last night's Halloween party....Read More."

You don't wanna spoil that i mean you ruined Vampire's return because of your creepy blog. So now it's time to go practical...


Go To Blogger > Template > Mark 'Expand Widgets Templates'
Now find:

<b:include data='post' name='post'/>

Now replace above code with following:


<b:if cond='data:blog.pageType == &quot;index&quot;'>
<h3 class='title-only'><a expr:href='data:post.url'><data:post.title/></a></h3>
<b:else/>
<b:include data='post' name='post'/>
</b:if>


OK so after this your blog's post widget will look something like this:


Well you saved Vampire's return but your blog's post widget will look a bit ugly after this so now it's time to add some css.


Go To Blogger > Template
Search for ]]></b:skin> and just above it post following css:


/* -- Homepage Title Styling -- */
.title-only{
background: whiteSmoke;
padding: 10px;
color: black;
margin: 0;
border-bottom: dotted 2px;
}
.title-only:hover {
background: white;
}

Save your template and after doing all this your blog's post widget will look something like this:


That's It...For any help or if you want to nominate me for president then leave your responses in the comment section below..... :)

Saturday, November 17, 2012

Tagged under: , , ,

Partition Data Recovery Software For Hard Disk, USB Cards


Partition Data Recovery Software For Hard Disk, USB Cards

Download free Partition Data Recovery Software Wizard and recover files From Hard disk, USB pen drive Cards and deleted, formatted or lost unallocated space use PartitionGuru is an excellent datarecovery tool and a powerful disk & partition management program.PartitionGuru is a partition management and data recovery program. In addition to traditional MBR partition table, it supports GUID partition table on GPT disks also.
In addition to basic partition management functions such as creating, deleting, hiding, formattingpartitions, it also provides more powerful functions like lost partitions recovery, deleted or lost files recovery, partition backup, partition clone, disk clone, quick partition, integral size partition, correct and check partition table error, advanced file operation, etc.
It also supports VMware, VirtualBox and Virtual PC virtual disk files. Support IDE, SCSI, SATA drive and USB disk, memory card. Supports FAT12 / FAT16 / FAT32 / NTFS / EXT3 file systems.


Recover lost partitions is one of the major function of PartitionGuru.When a lost partition is found, all attributes of the partition include all files in it will be displayed immediately. You can check the size and the type of the partition and even you can browse and preview all files and folders to check whether the partition is just your lost partition.

Recover Partition


PartitionGuru has powerful disk & partition management abilities, in addition to common functions such as creating, deleting, formatting, renaming and hiding partition, it provides more.

Recover Files


In many cases, a partition may become inaccessible and all files in it are lost. For example, a partition may be accidentally formatted while the files have no backups, a partition may be destroyed by virus or some software. When you try to open it with Windows Explorer, Windows usually prompt you the partition must be formatted.

DOWNLOAD HERE

Saturday, November 10, 2012

Tagged under:

Increase your RAM and so system speed

1). Start any application, say Word. Open some large documents.

2). Press CTRL+SHIFT+ESC to open Windows Task Manager and click Processes tab and sort the list in descending order on Mem Usage. You will notice that WINWORD.EXE will be somewhere at the top, using multiple MBs of memory.

3). Now switch to Word and simply minimize it. (Don't use the Minimize All Windows option of the task bar).

4). Now go back to the Windows Task Manager and see where WINWORD.EXE is listed. Most probably you will not find it at the top. You will typically have to scroll to the bottom of the list to find Word. Now check out the amount of RAM it is using. Surprised? The memory utilization has reduced by a huge amount.

5). Minimize each application that you are currently not working on by clicking on the Minimize button & you can increase the amount of available RAM by a substantial margin. Depending upon the number and type of applications

you can use together, the difference can be as much as 50 percent of extra RAM.

In any multitasking system, minimizing an application means that it won't be utilized by the user right now. Therefore, the OS automatically makes the application use virtual memory & keeps bare minimum amounts of the code in physical RAM.

Friday, November 9, 2012

Tagged under:

TRICK TO INCREASE YUR INTERNET SPEED!!!


How to increase Internet Speed?

1) Click “Start” and then select “Run”

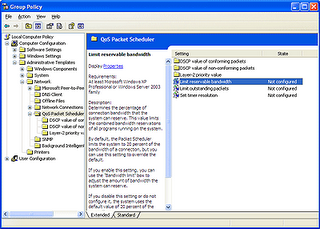
2) Type “gpedit.msc” for Open Group Policy window

3) In Computer Configuration (left column) click “Administrative Templates”

4) Then click “Network” and click “Qos Packet Schedule”

5) In the Right-column, click “Limit reservable bandwidth” for open properties


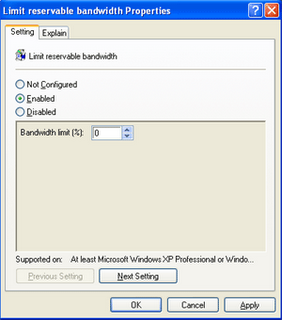
6) Click “Enable” and change “Bandwidth limit” from “20%” to “0%”


7) Click “Apply” and then “OK”

8) Restart computer and try to surf Internet again.

Saturday, November 3, 2012

Tagged under:

Trick To Make Your PDF Files Speak


How to Make Your PDF Files Speak to You.

This is an Interesting Trick i found in Adobe Reader. This works in Adobe Reader 7.0 through the latest

1. First of all Install Adobe Reader , if you haven’t already.

 
2. So first you go to View>Read out Loud> Activate Read Out Loud.

 
3. After you have done that just do this.

Now it will read it to you out loud in the Default Microsoft Sam voice.


Tuesday, October 30, 2012

Tagged under:

Create folder/file without Name!!


Just follow the steps as given below :-

1) Select any file or folder.

2) Right click on it, select 'Rename' or simply press 'F2'.

3) Press and hold the 'Alt' key. While holding the Alt key, type numbers '0160' from the numpad.

Note :- Type the numbers '0160' from the numpad, that is, the numbers present on the right side of the keyboard.

Don’t type the numbers which are present on top of the character keys.

4) Press Enter and the nameless file or folder will be created.

for example check out the below img


Reason :- The file or folder that seems nameless is actually named with a single space.
But what if you want to create another nameless file or folder in the same directory ?

For this you will have to rename the file with 2 spaces.

Just follow the steps given below :-

1) Select file, Press 'F2'.

2) Hold 'Alt' key and type '0160' from the numpad.

3) Release the 'Alt' key. Now without doing anything else, again hold 'Alt' key and type '0160'.

4) Press 'Enter' and you will have second nameless file in the same directory.

5) Repeat step 3 to create as many nameless files or folders in the same directory.


Saturday, October 27, 2012

Tagged under:

TRICKS FOR TASK MANAGER


Task Manager Tips


At first glance Task Manager looks like nothing more than a geeky way to tell you what you already know, the names of the programs running on your PC.


Explore out favorite Task Manager tricks, though, and you'll find all kinds of options for monitoring your system, detecting and resolving problems, especially in its most modern Windows Vista/Windows 7 incarnation. Here's what you need to know.


1. Browse your processes


Press Ctrl+Shift+Esc to launch Task Manager. By default the first thing you'll see is the Applications tab, but this is misleadingly named and of little much use as it just lists top-level windows. If you want to see what's actually running on your PC then click the Processes tab, click "Show processes from all users", and scroll down the list. If you don't know what a process is then right-click it and select Properties to get more information, such as the folder where it's stored, which will usually offer additional clues.


2. Troubleshoot startup problems

Windows Media Player is known to crash from time to time (you may have noticed this). Occasionally it'll crash without having any visible window, though, so you won't see there's a problem. Then, when you come to restart the program, nothing will happen because it's blocked by the crashed copy in RAM.


If you find Windows Media Player won't launch, then, fire up Task Manager, click the Processes tab and look for a WMPlayer.exe process. If you find one, and there's no window, then it's probably crashed. Right-click it in Task Manager, select End Process, and once it's shut down you should be able to start Media Player as normal.


Much the same problem can happen with other applications, so if something won't start, or is just misbehaving, then it's always a good idea to look for previous instances of the program. Don't use the "End Process" on anything unless you're 110% sure that it's safe to do so, though - terminating something system-critical can lock up or crash your PC immediately.


3. View memory use


It's often interesting to see which programs are using all your RAM. To find out, click the Processes tab, then click View > Select Columns, and ensure Memory - Working Set and Memory - Private Working Set are checked. You'll now see two estimates for your processes use of RAM.


The first, "Memory - Working Set" shows you how much physical memory is currently being taken up by each process. Some of this RAM may be shared by other processes, though (shared DLLS, for instance) so this figure tends to overestimate memory use.


The second, "Memory - Private Working Set" shows you how much physical memory this process alone is using (that is, it can't shared with anyone else). It will almost certainly consume additional RAM, though, so this figure tends to underestimate memory use. It's a little more reliable than the Working Set alone, but really you need to see both.


Now click the "Memory (Private Working Set)" column header so the largest figures are at the top. You'll immediately get a good feel for where your RAM is going, and which programs (if any) you need to close or tweak to get some of it back.


RAM HOGS: Find out which programs are hogging your RAM in seconds


4. Identify RAM-hogging services


Your list of processes should contain many called svchost.exe (if not, then you've not clicked "Show processes from all users"). This is the service host, a process that's used to run several Windows services. But what if this turns out to be grabbing large amounts of RAM? Which services might be to blame?


To find out more, right-click a particular svchost.exe and select Go To Services. Task Manager will open the Services tab and all the services managed by this particular instance of svchost.exe will be highlighted. Task Manager has no way to tell you how much each RAM each of the services are consuming individually, unfortunately, but this does at least greatly reduce your options. (And a hint: in most Windows Vista installations, ReadyBoost is by far the greatest resource-hogging service.)


5. Diagnose disk thrashing


Ever wondered exactly why your hard drive's been thrashing for ages, even though there's no-one at the PC? Click the Task Manager Processes tab, then click View > Select Columns, and check I/O Read Bytes and I/O Write Bytes. Click OK.


The new columns will show you the total amount of data read or written by a process, which applies to network activity as well as your hard drive. The busiest processes will have the largest figures, and if a process is active now then its totals will tick up as you watch.


6. Spot resource leaks


Sometimes processes grab more and more Windows resources, without ever quite getting around to releasing them. 32-bit Windows in particular has only a limited supply, and if this goes on for too long then your PC will become unreliable, then eventually lock up or crash.


Task Manager can help you spot a resource leak, though. Click the Processes tab, then click View > Select Columns, check Handles, User Objects and GDI Objects, and click OK. Now check these occasionally, along with the memory figures we mentioned earlier. Some of these may rise dramatically, on occasions - an antivirus tool will use many more handles when scanning, for instance, as they're used when accessing files - but if a particular resource figure is high, keeps rising, and never falls back to its starting point, then you may have a problem.


7. Stop a runaway process


If a particular process has gone rogue, using all your CPU time and reducing everything else to a crawl, then Task Manager may be able to help.


First, press Ctrl+Shift+Esc and wait for Task Manager to appear. If your runaway process is completely tying up the CPU then this can take a while, but if you don't want to reboot (you've an application with unsaved data, say) then be patient. We'd give it at least 10 or 15 minutes.


When Task Manager appears, look for the process consuming all your CPU time (click Processes, then click View > Select Columns and check CPU if that column isn't displayed). If you want to kill the process completely, then you could right-click it, select End Process and it'll die (most of the time).


This doesn't always work out as you expect, though. If the process is system-critical, maybe a Windows component, then terminating it may crash your system immediately (and it always introduces a risk of system instability). If you've data you need to save elsewhere then it may be better to try and slow down the rogue process, reduce its grab on your resources, so you can use other programs again and close everything down properly. Fortunately Task Manager can help here, too.


Right-click your CPU-hogging process, select Set Priority > Low, and Windows should immediately give more CPU time to just about everything else on your PC. The program will still be running, it just shouldn't interfere with other apps to the same degree, and they should be accessible again.


If there are still problems, right-click the process and select Set Affinity. This option lets you decide which CPU cores a process can use. If you clear one of these then that core will become available to other applications, which should significantly improve their performance.

Friday, October 26, 2012

Tagged under:

Trick to view all your USER Account at just one click !!!


To view all of the user accounts just click on

Start ->Run and type in “CMD“

Now just type “net users” (without quotes).

This will show you all accounts that is made onto the computer whether it is hidden or not.

Make sure that you Log into the computer that has administrative rights, for these type of works we need admin rights that’s why i did not mentioned above

So click on Start -> Run -> and type in “CMD”.
 
Now type “net user” and then name of account then * and press enter.
 
The format will be: net user Administrator *
Put the name in quotes if it contains spaces like: net user “str Graphics” *
Then that will ask you to change the password, just change the password

Thursday, October 25, 2012

Tagged under:

TRICK TO DELETE REGISTERY ERRORS


JUST FOLLOW  SIMPLE STEPS

    1    Press "Start," "Control Panel" and "System." Choose the "System Restore" tab and click "OK." 
         The system restore window appears. Enter "restore point before registry edit" for the Restore Point   Description field. Click "Create" to make your restore point.
       
     2   Locate the full path name for the item you want to remove. The most advanced malware (viruses,  
        browser hijackers, trojans, spyware and adware) hide within the registry. Your virus protection or anti-spyware program will provide the malware path for the item it can't remove.
       
     3   Choose "Start" and "Run." Type "regedit" in the pop up window. Select "File" and "Export" and save your current registry information. Select "Edit" and "Find" to search for the malware path.
       
    4    Right click and select "Modify" to review the registry file. Check the registry entry to see it matches your malware information. Right click and select "Delete" to remove the file. Only delete one file at a time.
       
     5   Reboot your PC. Test all software and hardware. Make sure that everything works before creating a new system restore point. Return to the registry editor and delete the next malicious pathway

Saturday, October 13, 2012

Tagged under:

Recover back data from currupted Pen Drive


 Recover Data for Pen drive data recovery software retrieves data lost due to accidental deletion, Human error, Virus attack, damaged file system, hardware malfunction and various type of system failure. Pen drive recovery software designed to recover and restore pen drive data from formatted, deleted or corrupt logically crashed portable removable media drives.

Recover Data - Pen Drive Data Recovery Software is capable to retrieve lost data & undelete files that has lost due to some common reasons as follows:
  • Software Virus attacks
  • Hardware malfunction
  • Improper shutdown
  • Human Errors
  • Software corruption
Recover Data for Pen Drive Memory stick data recovery software is safe, easy, Non-Destructive and Read-only removable usb drive data retrieval software utility that undelete and salvage lost data, files & folders from formatted USB Pen drive. Rescue Pen Drive Data Recovery Software is used to restore, recover and retrieve lost, missing, deleted, formatted or corrupted Data, files/folders from damaged logically crashed memory sticks, USB thumb drives, pen drives, external USB hard disk Drives or other USB removable disk drive.

Recover Data - Pen Drive Data Recovery software is an easy & simple to use Data Recovery Software and Undelete Pen Drive Tool which do not require any specialized skills. Software consists of simple steps while recovering lost or deleted data as follows:
  • Plug the Pen drive in your Computer System using USB Port.
  • Install demo version of the software & run the software.
  • Software displays your Pen Drive or Disk.
  • Select your Pen Drive and proceed further.
Recover Data for Pen Drives Software is an advanced Pen Drive Data Recovery Tools that allows you to rescue, salvage & recover lost or deleted files and folders from crashed, inaccessible and corrupted USB media including USB pen drive, zip drive, memory stick, USB flash drives (compact flash, multimedia card, secure digital card, smart media etc.) and other similar data loss.

Thursday, October 11, 2012

Tagged under:

HOW TO SET YUR FOLDER PRIVACY!!!


HOW TO SET YUR FOLDER PRIVACY!!!

How to make an invisible folder, so that no one can see your folder which is too personaL FOR YU

1.create a new folder

 2 select that folder & press F2 & press backspace until the name “new folder” vanish
3 now by pressing ALT key, type 0160 simultaneously (at the same time) & hit enter.

4 now you can see the folder name is vanished.

5 to make folder icon invisible

6 right click on that folder & goto
–>properties
–>customize 
–>change icon 
->(now Check d above picture)